How to Create a Facebook Page for Content Creator: The Complete Blueprint for 2026
The creator economy has matured into a competitive, professional landscape. Relying exclusively on short-form feeds or third-party distribution algorithms without a centralized hub is risky. For writers, video producers, podcasters, educators, and niche specialists, a dedicated presence on Facebook remains one of the most reliable ways to capture broad demographic reach, build community groups, and unlock diverse monetization programs.
Understanding how to create a Facebook page for content creator profiles is the first real step in turning casual posts into a scalable media brand. It separates your personal social circle from your public persona, unlocks Meta’s professional monetization and analytical tools, and gives your work a polished, trustworthy home.
Here is a practical, field-tested guide to building, configuring, and growing a creator-first Facebook page from the ground up.
Why a Dedicated Creator Page Beats a Personal Profile
Many emerging creators hesitate to launch a standalone page, wondering if using their personal profile’s "Professional Mode" is enough. While Professional Mode offers basic analytics and monetization, establishing a dedicated Facebook Page offers structural advantages that personal profiles cannot match:
-
Separation of Personal and Public Life: A dedicated page protects your privacy. You can publish under your creator alias, collaborate with sponsors, and run advertisements without exposing your personal friend list, family updates, or tagged vacation photos.
-
Team and Delegated Access: As your production workflow scales, you will likely need editors, copywriters, or community moderators. Pages allow you to grant granular permissions (Admin, Editor, Moderator) through Meta Business Suite without sharing personal account passwords.
-
Granular Data and Audience Insights: Creator pages receive detailed demographic analytics, viewer retention curves for long-form and short-form videos, peak active hours, and conversion tracking.
-
Advertising & Commercial Collaborations: A dedicated page can connect to the Meta Ad Manager, leverage branded content tags, access the Meta Creator Marketplace, and execute partner campaigns.
Phase 1: Planning Your Creator Identity
Before touching the Facebook interface, establish the foundation of your creator brand. An audience connects with clarity and voice, not ambiguous titles.
1. Page Name Selection
Your name should immediately tell people who you are or what domain you cover.
-
Personal Brand: Your Name (e.g., Alex Rivera)
-
Hybrid Descriptor: Your Name | Focus Area (e.g., Alex Rivera | Motion Design)
-
Media Publication: Niche Topic Hub (e.g., The Minimalist Kitchen)
Keep it concise. Avoid excessive punctuation, numeric strings, or terms you might outgrow if your content pivots slightly over time.
2. Category Placement
Meta's algorithm uses category tags to index your page across search results and recommend your content to relevant users. The primary category should almost always be Digital Creator, Content Creator, or Video Creator, paired with niche-specific subcategories such as Writer, Comedian, Musician/Band, or Educational Consultant.
3. Visual Assets Sizing Cheat Sheet
Have high-resolution visual branding prepared so your page looks professional the moment it goes live:
| Asset | Ideal Dimensions | File Format | Design Best Practice |
| Profile Photo | 500 × 500 px | PNG | High-contrast headshot or distinct personal logo. Keep the subject centered to prevent awkward circular cropping. |
| Cover Graphic | 820 × 312 px (Mobile Safe: 640 × 312 px) | PNG / JPG | Clear value proposition statement, upload schedule, and secondary handles. Keep critical text away from the left corner where the profile image overlaps on desktop. |
Phase 2: Step-by-Step Creation Guide
You can launch your page on desktop via any web browser or through the Meta Business Suite mobile app. The desktop workflow provides the smoothest setup experience.
Step 1: Open the Creation Portal
-
Log in to your personal Facebook account.
-
Click the Menu grid (nine dots) in the top-right toolbar.
-
Under the Create column, select Page.
-
Alternatively, navigate directly to
[facebook.com/pages/create](https://facebook.com/pages/create).
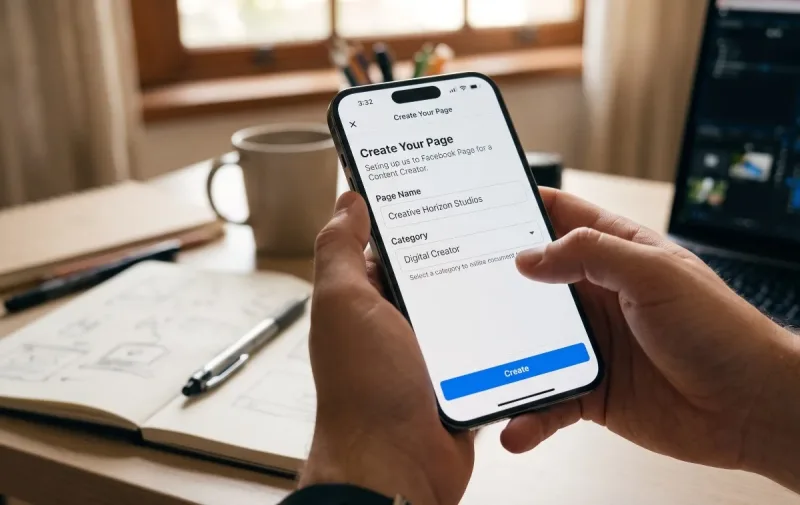
Step 2: Input Core Identity
On the left-side setup pane, complete the initial three fields:
-
Page Name (Required): Enter your chosen creator brand name.
-
Category (Required): Type Digital Creator or Content Creator and select it from the dropdown. You may select up to three related tags.
-
Bio (Optional but Recommended): Write a concise 1–2 sentence summary explaining your content focus (e.g., "Weekly deep dives into independent cinema, narrative storytelling, and screenwriting craft.").
Click Create Page.
Step 3: Complete Contact & Public Profile Details
Meta will prompt you to enter business-style information. As an individual creator, tailor these to your workflow:
-
Website: Add your personal website, portfolio, Linktree, or YouTube channel link.
-
Email: Use a dedicated, professional business inquiries email (avoid personal addresses).
-
Phone Number & Address: Leave these blank unless you run a physical studio that welcomes public visitors. Unchecking physical location settings keeps your private residence hidden.
Step 4: Upload Visual Branding
-
Click Add Profile Picture and choose your centered 1:1 image.
-
Click Add Cover Photo and align your banner graphic. Use the preview pane on the right side to toggle between Desktop and Mobile views to ensure no text is cut off.
Step 5: Configure the Action Button (Call to Action)
Click Add Action Button to establish the primary action new visitors should take:
-
Watch Now: Best for video creators sending audience traffic to a flagship YouTube series or video playlist.
-
Send Message: Ideal for creators offering custom commissions, speaking engagements, or advisory consultations.
-
Learn More / Sign Up: Excellent for driving newsletter subscribers, blog readers, or digital product downloads.
Click Next, verify the destination link, and tap Save.
Step 6: Connect WhatsApp (Optional)
If you manage creator partnerships or community inquiries via WhatsApp Business, link your number. If not, tap Skip to protect your communication boundaries.
Step 7: Finalize Page Setup
Toggle Page notifications on your profile to On so you never miss critical audience comments or platform notices. Click Done. Meta will automatically load your new Page interface.
Phase 3: The Creator Optimization Checklist
Setting up the page is the technical minimum. Transforming it into an authoritative creator hub requires configuring its backend architecture.
1. Claim Your Custom Vanity URL
A default page URL contains an unwieldy string of random digits. A clean username reinforces your brand across social platforms and search engines:
-
From your Page dashboard, open Settings & Privacy > Settings.
-
Under General Page Settings, locate the Username field.
-
Enter your handle (e.g.,
[facebook.com/AlexRiveraFilms](https://facebook.com/AlexRiveraFilms)). -
Save changes.
2. Configure Meta Business Suite
Download the Meta Business Suite app on mobile and bookmark business.facebook.com on desktop. This is where you should manage the business side of your work:
-
Draft and schedule cross-platform posts for Facebook and Instagram simultaneously.
-
Access the unified communications inbox for Messenger and Instagram DMs.
-
Review content retention curves and demographic breakdowns.
3. Set Up Automated Messaging Filters
Creators receive substantial message volume. Protect your creative focus by setting up light automation:
-
Go to Meta Business Suite > Inbox > Automations.
-
Turn on an Instant Reply to acknowledge incoming messages, provide links to frequently requested resources, and state that replies may take several business days.
-
Use Frequently Asked Questions (FAQs) to automatically answer recurring questions about gear setups, collaboration guidelines, or portfolio links.
Phase 4: Foundational Content Architecture
Never invite potential fans, friends, or collaborators to a blank profile. Before sharing your page, populate your feed with three distinct anchor posts:
1. The Pinned Manifesto / Welcome Post
Write a comprehensive introductory post introducing yourself.
-
Who you are and what sparked your creative work.
-
The specific topics, formats, and schedules followers can expect.
-
Direct links to your newsletter, portfolio, or active community groups.
-
Pin this post to the top of your feed by clicking the three dots (
...) on the post and selecting Pin Post.
2. Your Signature Value Piece
Publish your strongest piece of content—a high-production video, a detailed written breakdown, or an infographic asset. This immediately proves your editorial value to early visitors.
3. A Conversation Catalyst
Post an open-ended, niche-specific prompt that invites comments. For instance, an illustrator might post: "What is the hardest design habit you had to unlearn this year? Here is mine..." This signals to early visitors that your page is a community forum, not a one-way announcement board.
Phase 5: Building Organic Reach & Audience Momentum
The Facebook distribution engine rewards native formats and active, retention-driving media.
1. Prioritize Vertical Reels for Discovery
Short-form vertical video (Reels) is currently Meta’s primary driver of non-follower discovery.
-
Keep hooks within the first 3 seconds.
-
Include burned-in captions; a massive percentage of mobile users browse feeds without sound.
-
Focus on clear educational points, dynamic visual changes, or compelling narratives.
2. Pair Your Page with a Facebook Community Group
Pages act as your public broadcast channel; Facebook Groups act as your community clubhouse.
-
Link an official Facebook Group directly to your Page under Settings > Linked Groups.
-
Groups foster user-to-user discussion, protect you from algorithmic dips, and create superfans who regularly advocate for your work.
3. Engage Authentically in the First 60 Minutes
When your content publishes, stay active in the comment section for the first hour. Answering early questions and sparking conversations signals meaningful engagement to the distribution algorithm, prompting wider delivery across follower and recommended feeds.
Phase 6: Understanding Meta Monetization Programs
Once your page develops a consistent audience, you can unlock diverse revenue streams directly within Meta’s monetization framework:
-
In-Stream Ads: Short advertisements placed before, during, or after your longer-form native video content (videos running 3+ minutes perform best).
-
Ads on Reels: Revenue shares generated from non-intrusive banner or overlay ads placed on your high-performing Reels.
-
Stars: A virtual gifting mechanic where viewers purchase Stars to support you during live streams or on video uploads.
-
Subscriptions: Recurring monthly payments from dedicated followers in exchange for exclusive badges, private posts, subscriber-only community groups, or direct Q&As.
-
Meta Creator Marketplace: An integrated platform where brands discover creators for paid sponsorship deals, reviews, and influencer campaigns.
To track your eligibility, review the Monetization tab inside your Meta Business Suite dashboard. Build clean, original content free of copyright strikes to ensure your account remains in good standing.
Final Thoughts
Learning how to create a Facebook page for content creator operations is simple, but consistent execution separates professional creators from casual posters. Treat your page as an independent publication: maintain consistent visual branding, share native content that respects your audience's time, and respond thoughtfully to early community members. Over time, that structured approach builds a loyal, durable audience across the Meta ecosystem.